


Today, we're exploring a common question I get asked all the time: "Can you bake air dry clay?" It's a great question, and one that deserves a thorough answer.
The Short Answer: No, But It's Complicated.
Air dry clay, as the name suggests, is designed to dry... well, in the air! It doesn't require baking to cure. In fact, baking air dry clay can actually do more harm than good. So let me explain why and provide you with some awesome alternatives that have worked for me and countless Claymoo users.
What is Air Dry Clay?

So what makes air dry clay so special? Air dry clay, like the soft foam clay we use in our Claymoo kits, is a type of modeling clay that hardens when exposed to air. It's made from natural clay minerals, water, and other additives that help it maintain its structure as it dries.
At Claymoo, our air dry foam clay is made with microspheres imported from Japan, purified water, adhesives, humectants, water-based pigments, and preservatives. This special mix makes our clay super soft and squishy - kind of like play slime! When you touch it, you'll love how smooth it feels and how easy it is to shape with your hands.
The Drying Process: Patience is Key
One of the most common reasons people ask about baking air dry clay is because they're looking to speed up the drying process. And I get it! When you're in the creative zone, waiting for your masterpiece to dry can feel like watching paint dry (literally!).
I remember when I first started working with air dry clay. I was so excited about a miniature garden I was creating that I wanted it to be ready immediately. But I quickly learned that rushing the process often led to disappointing results. Now, I tell all our Claymoo customers that our clay will typically air dry within 24-48 hours. However, depending on the humidity in your area, it can take up to 5 days in some cases.
If you live in a particularly humid area, consider using a dehumidifier in your crafting space. I've had customers in Florida tell me this trick has worked really well for them. Basically, it speeds up the drying process naturally without compromising the integrity of their creations.
Why Baking Isn't Recommended for Air Dry Clay
Now, let's address the elephant in the room: why shouldn't you bake air dry clay? There are several reasons, and I've learned most of them the hard way so you don't have to!
First, there's the risk of cracking. Air dry clay contains moisture that needs to evaporate slowly. Baking can cause this moisture to evaporate too quickly, leading to cracks or warping in your project. I once tried to speed up the drying of a delicate flower sculpture by putting it in a low oven. The result? A beautiful bloom turned into a cracked, sad-looking mess.
Then there's the potential for burning. Unlike polymer clay, which is designed to be baked, air dry clay can burn if exposed to high temperatures. This can ruin your project and potentially create unpleasant fumes.
Baking can also cause uneven drying. The outside of your clay piece might dry faster than the inside, leading to an uneven finish or internal moisture that can cause problems later. One of our Claymoo users tried this and ended up with a piece that looked perfect on the outside but was still damp inside. A few days later, it started to warp and lose its shape.
Lastly, baking could compromise the unique properties of air dry clay. Our Claymoo air dry foam clay, for instance, has a slightly flexible quality when dry. Baking could make your finished piece more fragile, taking away that special characteristic that makes it so versatile for various projects.
Alternatives to Baking

So, if we can't bake air dry clay, what can we do to work with it effectively? Over the years, I've discovered several methods that work great, and our Claymoo community has shared their successes too.
The best method, hands down, is simply to let your clay air dry naturally. Find a cool, dry place away from direct sunlight and let nature do its thing. I like to set up a dedicated drying area in my craft room where I can leave pieces undisturbed.
If you're in a hurry, you can use a fan to circulate air around your clay piece. This can help speed up the drying process without risking damage from heat.
For small pieces, you can place them in a sealed container with a desiccant like silica gel packets. This can help draw out moisture more quickly. It's a trick I learned from a Claymoo user who makes miniature sculptures, and it works like a charm for tiny details.
If you're working on a larger or more complex piece, try working in layers. Allow each layer to dry partially before adding the next. This can help prevent cracking in thicker sections.
Best Practices for Working with Air Dry Clay

At Claymoo, we're all about making clay crafting easy and enjoyable, and these tips have been refined through countless hours of crafting and feedback from our wonderful community.
Workspace Setup
First things first, prepare your workspace. Find a clean, non-stick area to work on. I like to use a smooth ceramic tile, but a piece of glass or a non-stick craft mat works great too. Always wash your hands before handling the clay to avoid transferring dust and debris. You'd be surprised how much of a difference this simple step can make in the final quality of your piece.
Clay Preparation
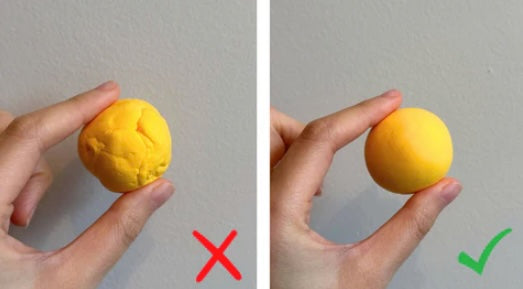
Before you start sculpting, give your clay a good stretch. This helps remove air bubbles and achieve a smooth, silky texture. It's like warming up before exercise - it basically gets your clay ready for action. I always find this process oddly satisfying, and many Claymoo users tell me it's their favorite part of the crafting process.
Handling Techniques
When you're working with our soft air dry foam clay, remember to handle it with care. Avoid squeezing or applying excessive pressure. Use gentle movements to shape and mold your creation. One of our users told me he pretends he's shaping a delicate cloud, and his pieces turn out beautifully every time.
Moisture Management
Managing moisture is key when working with air dry clay. If your clay feels too wet, let it sit out for a few minutes to firm up. If it's too dry, add a little water and knead it in. It's all about finding that sweet spot where the clay is pliable but not sticky. With practice, you'll develop a feel for the perfect consistency.
Joining and Assembly
Joining pieces of clay can sometimes be tricky, but I've found that using a bit of water usually does the trick. If water isn't enough, don't be afraid to use a little regular white glue. It works like a charm and dries clear. This tip has saved many a Claymoo project from falling apart!
Working with Tools
If you find that clay is sticking to your tools (like the bamboo toothpick we include in our kits), try waiting a few seconds until the clay is slightly drier before continuing. This little pause can make a big difference in the precision of your work.
Storing Air Dry Clay

Proper storage is key to keeping your air dry clay in great condition. At Claymoo, we've developed these storage tips through trial and error (and maybe a few dried-out clay disasters).
Always keep unused clay in its original plastic baggie, sealed tightly to prevent air exposure. I like to squeeze out as much air as possible before sealing.
Store your clay in a cool environment away from direct sunlight. I keep mine in a drawer in my craft room, safe from the sun's drying rays. One Claymoo user in Arizona told me she keeps her clay in a cooler in her garage to protect it from the intense heat!
For the best quality, try to use your clay within 2 months of purchase. But don't worry if it dries out - you can usually rehydrate it with a bit of water. I've brought clay back from the brink of dryness many times, kneading in a little water until it reaches that perfect consistency again.
Troubleshooting Common Air Dry Clay Issues
Even with the best techniques, sometimes things don't go as planned. But don't worry - I've been there, and so have many Claymoo users. Here are some common issues we've encountered and how we've solved them.
Addressing Cracks
Cracking is normal in air dry clay work. If your piece develops cracks as it dries (and you're fully dry), you can often repair them by applying a small amount of fresh clay mixed with water to create a slip. Cracks can be easily fixed with fresh clay by smoothing this over the crack and allowing it to dry. I've saved many projects this way, including a delicate leaf bowl that started to crack along the edges.
Preventing and Correcting Warping
Warping can be frustrating, but it's often preventable. Make sure your clay is an even thickness throughout. If you notice warping as it dries, you can gently reshape it periodically during the drying process. One Claymoo user told me she checks her pieces every few hours during the first day of drying, gently adjusting as needed.
Avoiding Surface Sticking
If your clay is sticking to your work surface, try working on a piece of wax paper, a non-stick craft mat, or even a clean baking sheet covered with parchment paper. I learned this the hard way after ruining my dining table (and earning a stern look from my partner!). Now, I always make sure to protect my work surface, and my projects (and furniture) are much better for it.
Handling Air Bubbles
Air bubbles can sometimes form in your clay, but don't panic! If you notice them, simply pop them with a pin and smooth over the surface. It's almost like giving your clay a little acupuncture session.
Inspiring Clay Projects to Try
Here are a few ideas that have been popular among our Claymoo community:
Create a miniature garden! I love crafting tiny planters and succulents. It's like having a little piece of nature on your desk.
Home decor items are always a hit. You can make coasters, trinket dishes, or decorative wall hangings. I have a set of clay coasters I made, each one painted to look like a slice of different fruits. They always make me smile when I use them.
For a quick and easy project, try making some fridge magnets. You can craft cute, customized magnets for your fridge or memo board. I have a set of emoji magnets that never fail to brighten my day when I see them on my fridge.
The Claymoo Difference
At Claymoo, we're passionate about making clay crafting accessible and fun for everyone. That's why we've put together our DIY clay kits with everything you need to get started. Each kit comes with our premium, high-quality soft air dry foam clay, step-by-step guides in both video and text format, and a bamboo crafting tool for detailed work.
We've done the hard work of sourcing materials and creating guides so you can skip right to the fun part - creating!
Conclusion
So, can you bake air dry clay? The answer is no, but as we've discovered together, that's not a limitation - it's an opportunity! Air dry clay offers a world of creative possibilities without the need for special equipment or complicated techniques.
Always remember, the key to success with air dry clay is patience. Give your creations time to dry naturally, and you'll be rewarded with beautiful, long-lasting pieces that you can treasure for years to come. I have air dry clay creations that I made years ago that still look as good as the day they dried.
At Claymoo, we believe that everyone has an inner artist just waiting to be unleashed. Whether you're a complete beginner or an experienced crafter, air dry clay offers endless possibilities for creation and self-expression. I've seen people who claimed they weren't creative at all produce stunning pieces with our clay kits.
Happy crafting, everyone! And remember, if you ever need inspiration or have questions, we're always here for you at Claymoo.
FAQs
Can you speed up the drying process of air dry clay in a cold oven?
While it's tempting to use a cold oven to speed up drying, it's not recommended for air dry clay. The enclosed space can trap moisture, leading to uneven drying and potential cracking. Instead, use a fan or dehumidifier to circulate air and speed up the natural drying process safely.
How does air dry clay differ from polymer clay in terms of baking?
Air dry clay and polymer clay are fundamentally different. Air dry clay hardens through air exposure and doesn't require baking. Polymer clay, however, needs to be baked at specific temperatures to cure. Attempting to bake air dry clay can lead to cracking, burning, or loss of its unique properties.
Can you mix air dry clay with other clays that require baking?
Mixing air dry clay with bake-able clays is not recommended. These clays have different properties and curing methods. Air dry clay will crack or burn in the oven, while bake-able clays won't properly cure at room temperature. For best results, use each clay type separately according to its specific instructions.
Is air dry clay suitable for creating food-safe surfaces?
Air dry clay is not suitable for creating food-safe surfaces. While it's non-toxic, it's not designed to be food-safe even after drying. The porous nature of air dry clay can harbor bacteria and is not easily sanitized. For food-safe projects, use clays specifically labeled as food-safe and follow proper glazing techniques.
Can you use a kiln to dry air dry clay faster?
Using a kiln to dry air dry clay is not recommended. Air dry clay is designed to cure at room temperature and can crack, warp, or burn in a kiln's high heat. The rapid moisture loss in a kiln can compromise the clay's structural integrity. For best results, allow air dry clay to dry naturally in a well-ventilated area.
How does the thickness of air dry clay affect its drying time?
The thickness of air dry clay significantly impacts drying time. Thicker pieces take longer to dry as moisture needs more time to evaporate from the center. As a rule of thumb, allow 24 hours of drying time for every 1/4 inch of thickness. Working in thin layers can help ensure even drying and reduce the risk of cracking.
Is it possible to mold air dry clay and then bake it for durability?
Molding air dry clay and then baking it is not recommended. Air dry clay is designed to harden through air exposure, not heat. Baking can cause cracking, warping, or burning. For best results, allow molded air dry clay to dry naturally. If greater durability is needed, consider using a polymer clay that's specifically designed for baking.